Introduction
Making music with a DAW (Digital Audio Workstation) involves knowing both hardware and software very well — you just can’t escape music technology. This can be a show stopper for our creativity when we need to write music. Many times we’re also working to match short deadlines, so with that in mind I will try to give you a few tips on how you easily can enhance your workflow and creative output working with Sonar. Even though this article is written with a regular song kind of project in mind, most ideas, tips or tricks can be implemented while working with voice talents making jingles and audio books, or even sound design for computer games. As other DAWs have similar functions as Sonar’s you might be able in applying some tips in other applications as well. The tips described in this article are straight forward to get around and can easily help you sorting things out so that you can spend more time making music and less time dabbling around your software.
Project Templates
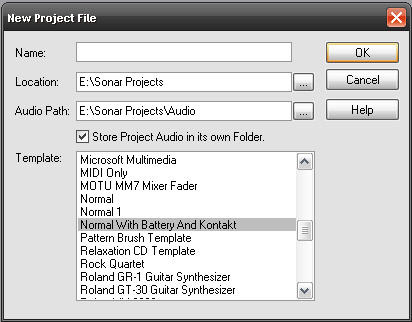
Most of us come back to a certain frame work where we like to start making music. It could be a few channels loaded with guitar amp plug-ins or a sampler loaded with a good sounding grand piano. Instead of recreating all of these instances of soft synths, channels and effects you can make a template that will automatically recreate favorite your setup.
To create a project template, simply open up an empty project and start creating the channels, buses, effects and soft synths you want to include. Then go to the file menu and select “Save As” and then choose “Template” in the menu labeled “Save as type”. In order for your templates to appear in the dialogue window at start up, you also need to save them down to the right folder. Which folder holds your templates can be set by going to the “Options” menu, then “Global” and finally, click the “Folders” tab. Your project templates are stored in the folder selected in the “Templates” menu.
Make a template for all the different kinds of music you usually record or produce. You may want to create one for rock band, another for ambient music and so on. Also create a template that uses smaller sample libraries and less CPU demanding soft synths. Depending on your computer’s specifications you could choose a setup that you can work with without freezing or bouncing tracks. While writing, an economy setup usually works well and you can always replace the temporary sounds with your best samples and soft synths during the mixdown of the song.
Track Templates
You may have been trying to figure out how you managed get that particular sound on a previous recording of yours? Of course, going back to that project and write down the settings and which plug-ins that where used does the trick, but with track templates you have access to all your favorite sounds in seconds. By saving a particular channel which includes, let’s say, a guitar amp plug-in, compressor, equalizer settings and sends as a track template, you can easily recall all the settings.
To save a track as a track template right click on any track in the track pane and choose “Save As Track Template”. To load a template, simply right click in the tracks pane and choose “Insert From Track Template”. Select your track template and it opens up all plug-ins together with parameters associated to the track including sends and all effects.
Of course, as you move along saving more and more of your golden settings you build quite a library of track templates. Listen back to your recordings and take notes on elements you find particularly appealing – then open up those projects and locate and save your channels as track templates. Your favorite sound is now only a couple of mouse clicks away.
Track Manager
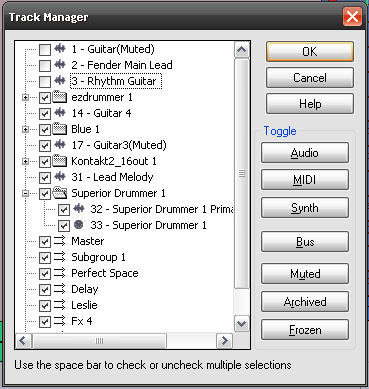
When your track count gets high you might find it hard to navigate through them all. In most cases you aren’t working on all tracks at the same time and therefore, you can use the track manager to temporarily clean things up a little. What the track manager really does is to help you select the tracks you want to be visible and deselect the ones you want to hide. Once your selection has been made the track view in Sonar will only show the selected tracks.
If you arrange your tracks with the track manager you’ll want to check back to it time to time, otherwise you might start thinking there are tracks missing (which isn’t the case of course as they’ve only been hidden). Naming your tracks well is also crucial if you want to keep things tidy. Bring up the track manager by pressing “M”.
Track Folders
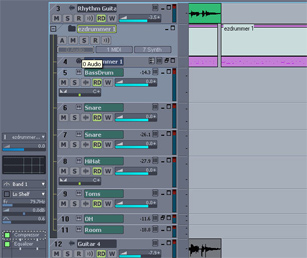
Using track folders is a clever way in handling many tracks of the same sort. If, for example, the vocal arrangement of your song includes more than a few tracks (lead, harmonies, overdubs etc) then placing them in a track folder is an easy way in making them take up less screen space. Sometimes the vocals alone on a song can extend up to ten, and even more channels, and while you work on other elements of the same song you really don’t need to see the vocal tracks. To create a track folder, right click in the tracks pane to the right of the inspector field, and choose “Create Track Folder”. Then drag the tracks you want to organize to the track folder. By clicking the plus sign you open the folder so that it reveals its contents, and by clicking the minus sign while the folder is open, it hides the tracks inside it.
Track folders that seem fairly obvious to create could be drum tracks, guitars or vocals but you can of course set up track folders as you like.
Markers
Use markers to point out certain sections in your arrangement that are particularly important. You may want to have a marker placed for each verse, chorus and bridge, but you can also use markers to point out a particular section you want to rework or change but have decided to do later. In order to add a marker, right click the time ruler and then choose “Insert Marker” (or press F11).
Colors
You can use colors to separate tracks and sections from each other. One idea is to give the choruses, let’s say, color blue and the verses color red. Or, you could make certain instrument groups have a specific color.
Last Words
Getting things sorted out in your DAW is means a lot for your workflow — but not everything. Try to keep things organized on your physical desk as well. Don’t leave things in mess, make sure you have note pads and working pens so that you’re always ready to take some notes or write down ideas. Some people like to use regular sketch pads for keeping track of thoughts and to do lists, some use a Wordpad document or similar, some use a white board while some prefer to use a PDA. Other things such as a good armchair can definitely make you feel more comfortable while working.
Deadlines can be extremely pressing if we can’t organize are daily work. Make sure you plan your day well and that you get things done. Losing work due to a failing disk can be disastrous but also unnecessary. There are plenty of backup tools out there and extra storage is cheap, so there is little excuse for not doing backups frequently. I’m using Acronis True Image which is scheduled to do a backup every day. Deadlines must be met, and losing a client due to a failing disk would be quite awkward – not to mention all the love and effort put in each piece of work. Therefore do your backups well, you will feel much safer knowing that you can’t lose too many hours of work no matter what.
Some of the tips above might seem obvious, but they’re very often overlooked, so I thought that a little reminder could be well in use.
About the author: Johan Hynynen, aka
Giannis, is a composer, producer and instrumentalist who is producing music
in a wide variety of different genres for TV, computer games, corporate
films, films and other productions. Look out for his label Akoume Music
Productions which not only will produce high quality scores for film, TV
and computer games, but will also produce Giannis’ chill-out solo project.
His website is at www.akoume.com


